Selecting Your Hunting Area
After you have focused on a few specific areas in a GMU, you will need to narrow your focus down to maybe
a couple of areas about 6-8 square miles each. These are areas that you actually plan to hunt and to possibly do some preseason scouting. For this part of the process you will need a good map.
I suggest that you purchase a U.S. Forest Service (USFS) map or Bureau of Land Management (BLM) 1:100,000 Scale Topographic Map series (these sell for about $6 each at USFS and BLM offices). The Forest Service map will mainly cover the USFS lands while the BLM map series covers the whole state. These maps will give you a good idea of the general topography of the area, the drainage pattern, elevations, roads, trails, and—very important—land status; what lands are public (forest service, BLM), what lands are state (CPW or State Land Board), where national monuments and parks are (where no hunting is allowed), and private lands. These maps will also show what areas are wilderness (travel restricted to foot and horseback only) and/or wilderness study areas (managed like wilderness areas). Search the map for the type of area you want to hunt.
Remember, when hunting public lands, the farther you get away from motorized vehicle and roads, the better the elk hunting should be. This is especially true after the first shots are fired on opening morning of the first rifle season. A general rule for public land elk hunting is to hunt areas that are at least 1-2 miles away from motor vehicles and roads. Search the maps for the largest areas without roads. Circle these areas as potential elk hunting areas.
Now you have to make a decision of how hard you are willing to work to get that elk. Remember, an adult cow weighs about 500 pounds and a mature bull can exceed 750 pounds on the hoof. Boned-out meat will be about 20% of the live weight but that is still a lot to carry out. (Colorado law requires that you must preserve all edible portions of meat for human consumption.) If you plan to hunt more than 3 miles away from your main camp or road, you should probably plan to pack-in (foot or horse) and make a spike camp.
Elk are most active at dawn and dusk; to be successful you should be at your hunting stand at this time. This can mean walking for over an hour in the dark to get in or out.
Learning Your Hunting Area
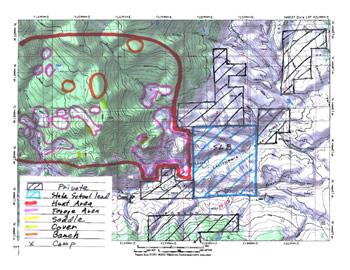
If you have the time and desire, you could search a whole 10-12 square mile hunting area on the ground. This could easily take a week or more and hundreds of miles of walking. Another way would be to study the area with the aid of a good map and possibly an aerial photo. Unfortunately, there is not a single map you can buy that will fill this need so you will have to make this map yourself. (Open the example while reading this section.)
 I suggest that you buy a U.S. Geological Survey (USGS) 7.5-minute quadrangle map, or topographical map—topo maps as they are generally referred to. These maps generally sell for $6-8 each. Another alternative, and one that I strongly recommend, is to purchase the National Geographic map series for Colorado. This CD map set requires a computer and printer. The set contains all the maps for the state of Colorado. The CD sells for around $70. Topo maps have detailed information (scale of 1 mile = ~2.6 inches). The maps will show broad vegetation types (forest, shrubland, marsh, grasslands), topography (40 foot contour interval), topographic and cultural features, roads and trails, and, most importantly, they contain the UTM (Universal Transverse Mercator) ticks or lines for navigation with a handheld GPS (Global Positioning System) receiver.
Mark your map with land status—you will need to mark areas that you can legally hunt vs. closed areas; private lands, national parks and monuments, state trust lands that have not been leased by the CPW, etc. Trace the land ownership patterns off of the BLM or U.S. Forest Service maps. (Hint: use the one-mile square sections as a guide.
Locate elk magnet areas—(First a little Elk Biology 101: elk require 4 main things to survive:
food, water, cover, and space.) Preferred food or forage for elk during most of the hunting season will be green grass and grass-like plants. After it snows more than 1-2 feet, elk diets shift over to woody plants and shrubs such as serviceberry and Gamble’s oak.
Water features (drinking and wallowing sites) are very important hunting areas for archery and muzzleloader hunters, especially in areas where water is limited. However, this is usually not the case for rifle hunters when hunting pressure is too great for elk to congregate around water holes during daylight hunting hours.
Cover or hiding areas for elk are large dense stands of forest or shrub such as spruce-fir forests or oak brush scrublands. Many of the vegetation types are located on steep, north facing slopes. The larger the patches of cover, the more the elk like them. Many of these areas will also contain a lot of dead and down timber, jackstrawed throughout the stand. This makes it very difficult and noisy to sneak up on bedded elk that rely on their very keen sense of smell and hearing to detect danger.
Space is required to provide the minimum amount of forage and cover for the elk herd to survive. An individual elk can have a yearly home range of over 500 square miles. Most elk migrate many miles from their high elevation summer range to their lower elevation winter range and use spring and fall transitional ranges in between to birth calves and for migration. Biologists have documented some migration up to 80 miles one way!
To be effective habitat, all of the above components need to be arranged in a manner that is usable for the elk. Biologists call this proper juxtaposition. To be effective habitat, the food, water, and cover needs must all be met within the daily travel pattern of the elk. Optimum ratios for food and cover areas are generally around 50:50.
Now, mark your map with elk magnet areas. These are areas that you can decipher using the vegetation shading and the topographic features on the map.
Locate the major feeding areas (open, grassy areas) and major cover or bedding areas. Undisturbed elk will migrate back and forth at dusk and dawn between these areas. In most cases, elk are a lot like some of us lazy people—they will take the path of least resistance. If they have to cross a ridge, they will generally go through the lowest point, at a saddle for example. If they have to travel the same direction as the ridges are running, they will generally travel along a ridgeline. After hunters disturb elk they tend to move less and become more nocturnal. When this is the case, hunters need to focus more on the smaller foraging areas, maybe natural clearings in dense forests, small depressions, small logged or burned areas, etc. Also, search for benches on steep slopes; sometimes these become the default foraging areas when hunting pressure is great. Another area type to search for is “pinch points”. These are small patches of timber between larger stands. Elk moving from one stand to the other will frequently use these “pinch points” to stay in their protective cover as much as possible.
Take a few minutes to look at the example map I created for this article. You can see the indications I have made on the map and how they relate to the information you have collected during your “at home” research and that done on the ground.
Natural Diversity Information Source (NDIS) Maps
Another source for free maps can be accessed from the Natural Diversity Information Source Website (NDIS) Hunting Atlas. This site will allow you to download the USGS maps and is the Colorado Hunting Atlas (an improved version of the popular MapIt! interactive mapping tool), which allows users to view summer and winter ranges, migration patterns, and concentration areas, all by specific big game species. Hunter Reference details can also be added that allow hunters to view places of interest, boundaries, campgrounds, Colorado Parks and Wildlife sales agents and more. These electronic maps can overlay elk activity areas (as well as pronghorn, mule deer, and white-tailed deer) such as winter range, summer range, calving areas, and migration corridors. Much of this data is coarse filter stuff that will help you to better learn your area and the elk that reside there. I suggest that you only use activity layers that will apply to the season you will be hunting. It will not be helpful to you to know where elk winter in this area if your hunting in the first rifle season. Instead, display elk summer ranges or summer concentration areas or migration routes.
NDIS maps have a lot of features. Take a few minutes and explore the Colorado Hunting Atlas.
Setting Up and Using Your GPS
One of the best technological advancements in the world over the past 30 years is the development of the satellite-based GPS receiver. This is the foundation of our modern star-wars weaponry systems, the way most land surveys are now conducted, and the preferred method for global navigation. The GPS has many beneficial uses for hunters and outdoor recreational users. It is beyond the scope of this article to explain all of what it does and how it does it. There are many great web sites and other resources that will help you become proficient with the GPS you have purchased. A good GPS will cost in the range of $100-400. You pay the extra bucks for more bells and whistles. I have found that I am never disappointed when I get the best, but sometimes this is not possible. If this is your situation, I would highly recommend that you at least buy a basic GPS—it will prove to be well worth the investment.
The better GPS receivers are capable of displaying topographic maps! Again, this is usually an additional cost but a wonderful improvement for elk hunting.
Many GPS receivers have a built in compass. However, I still prefer to have the old tried and true magnetic compass. If your GPS conks out or your batteries die, at least you will be able to tell north from south at anytime or in any weather condition.
The hunting topo map that you have developed above should have the (UTM) lines (northing and easting). These should be marked off in 1,000-meter intervals. You will need to set up your GPS to be compatible with this system of grid lines. In the GPS setup screen, for “position format”, select “UTM” or “UTM UPS”, etc.
Under “map datum”, you will need to select the datum that was used for producing your map. (The map datum is the mathematical formula that is used to make a flat map from a curved surface.) On a U. S. Geological Survey 7.5 minute topographic map the datum can be located in the lower left hand corner and it will usually say something like “Polyconic projection 1927 North American Datum”. If this is the case, use “NAD27 CONUS” which is an abbreviation for “1927 North American Datum for the Continental U.S.” Other popular map datum for Colorado include NAD 83 and WGS 84. Failure to use the correct map datum will usually result in errors in locations on the ground of up to 200 meters!
So why do you need a GPS? Because you can use the GPS receiver to navigate to all those hidden and secret elk magnets that you have identified on your map. You will need to determine the UTM coordinates of the site. This is a snap using UTMs and much easier than using latitude and longitude coordinates. It is just reading a graph with the easting (X coordinate) and northing (Y coordinate), the location of waypoints in meters north of the equator. The other parameter is zone. The earth is broken down into 60 zones. Colorado has 2 zones: zone 13 is east of a north-south line that basically runs through an area just east of Parachute Colorado. The rest of the state west of this line is all in zone 12. See MapTools for more info on using UTMs.
You can also use your GPS to locate your camp or car—you should not get lost! You can use your GPS to navigate to your hunting stand in the dark. For this, do a trial daylight run and turn on the “tracks” function in your GPS setup menu. The GPS will leave a “breadcrumb trail” that you can follow to your stand. (Hint: make sure that you set your map scale to a low level by zooming in on the screen so you can tell if you are on the correct trail or not.)
When you kill that big bull, set up a waypoint at the kill site and use the GPS to determine the best way to get back to it. It may not be the way that you came in! Sometimes, if you can travel other roads in the area, have your GPS set to “go to” your elk kill waypoint. Once you get the closest reading, park the ATV or truck and start packin'!
I cannot emphasize enough, if you are relying on this tool to get you from your camp to your hunting spot and back, that you have a backup system—a map, compass, and extra GPS batteries (usually AA). Failure to find your camp in a late season or wilderness hunt could be fatal, use caution!
This article and Lesson 4 - Using Technology have tried to provide you with resources to narrow down this big state (with its 23 million acres of public hunting lands, geography ranging from grassland plains to mountains over 14,000 feet in altitude, forests, streams, and meadows that are unmatched in the rest of the world) to a manageable size. This vast classroom, home to the largest population of elk in North America, can test the skills, patience, and wisdom of any hunter. But, for those who become a student of the hunt, seek to use all the tools, study guides, tutors and scholars, read the journals, test themselves, and truly learn the art of the hunt, it can be the most rewarding adventure imaginable.
(Note that the mention of products, services, and web sites in this article does not constitute expressed or implied endorsement by the Colorado Parks and Wildlife.)